How to make a Wedding Cake Part I: Sketching the cake
In this three-part series, we are tackling wedding cakes. I am super excited about this because we are going to decorate a wedding cake from sketch to final product. I know I promised this moons ago in my post how to make a tiered cake. But, I have been working on perfecting the design and the process. Truthfully, I was going through a moment where I temporarily suffered from a bout of perfectionism. However, I think I am good now. Anyway, this week we are in the planning phase. The planning phase is essential to making any cake, regardless of what kind of occasion. I am going to show you my secret for creating templates/design using Microsoft Word. It is quite easy to do and you really don’t need to know a whole lot about designing either.
What is the planning phase?
The first part of this planning phase is to choose a design. I would caution you to choose something that you can manage. Meaning that, if you are not great at hand piping, don’t choose something that involves a lot of hand piping. Since this cake is not for a client, I get free liberty to choose whatever design I want woohoo. I am obsessed with the back of lace dresses. Like a lot obsessed. Most of the painting I create on cakes are from the back (see hand painted cake here). Therefore, for this cake, I am going to design the back of a wedding dress.
The second part of this planning phase is to decide what medium you are going to use to make each part of the design come to life. What will you use? Are you going to use all fondant or fondant with royal icing stencils or fondant with edible lace? You can even stick to buttercream if you are not comfortable with fondant.
The third part is determining where to get all the materials you are going to need. Can you repurpose some of the molds you have in the house or do you need new molds? Now is the time to gather all the molds, stencils, etc.
This page may contain affiliate links which mean that I may earn a small commission if you make a purchase from any links directed from this website. I only recommend things that I use and the classes I have taken. Thank you very much for your ongoing support.
How to design your own wedding cake in Word
To design the cake you can use a wedding dress as inspiration. I just wanted flowers on the back of the dress with the buttons. So I found pictures of appliques (I am obsessed with those too) online and used them for this design. You will have to remain open to changing the design a bit if something does not come out the way you envisioned it.
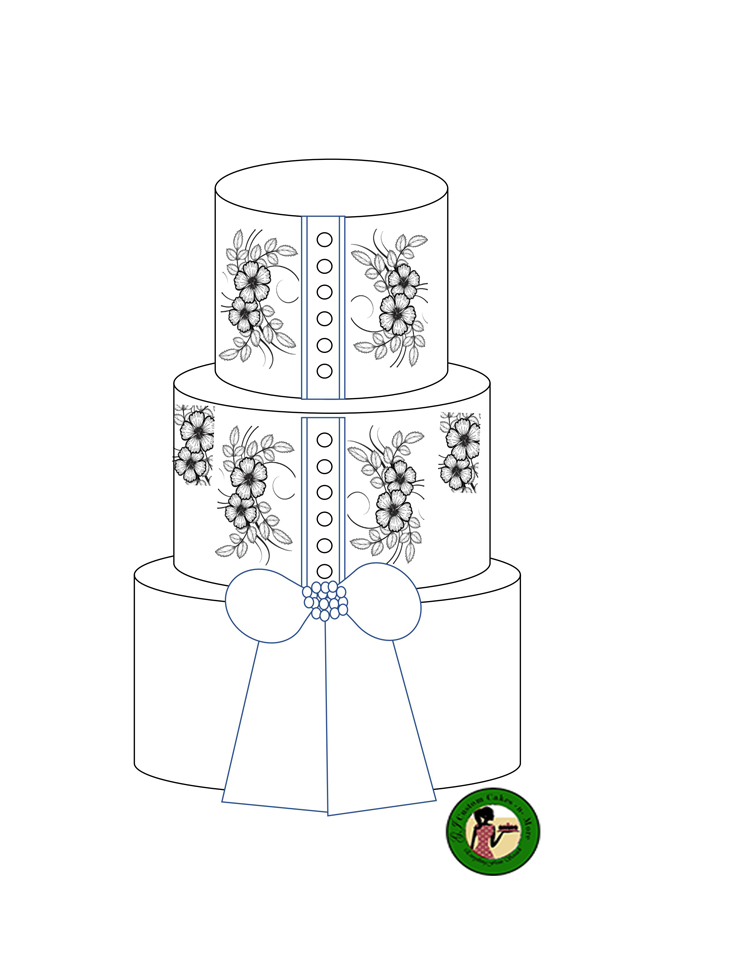
Step 1: Open Microsoft Word and create the first tier
Open Microsoft Word and select insert. Under the select tab, you should see shapes. Select shapes. Under shapes, there should be a heading for basic shapes, choose the cylinder. This should be your smallest tier. You can color it using format or let it remain white.
To color right click and select format shape. Then select fill option.
Step 2: Add the second tier
Follow the same steps above to add the second tier. This time make the cylinder a bit larger. Then under the drawing tool send the second tier backward i.e. select “send backward.” This will place the cylinder underneath the first one and therefore appearing as it is sitting on top.
You may choose to color at this phase or wait.
Step 3: Create the third tier
To create the third tier, either right click and copy the cylinder above or follow step 1 and 2.

The third tier should look like this. You now have a blank slate. Now it is time to begin the design.
Step 4: Color the top two tier and add buttons
I know I mentioned this before. But, to color, the two top tiers hold down the control key to select both cylinders and right click. This will give you the option to color both at the same time. I used a peach color it could be tan as well to mimic the skin tone underneath the dress.
To add the buttons first you need to make the fabric underneath. To make the fabric underneath, go to insert again and select from the flowchart area, the predefined process which will give you a nice rectangle with a smaller line. This is technically the stitch line.
Then select a circle and make it as small as possible. Create multiple copies of the circle and add to the rectangle similar to real buttons. Space them evenly. Hold down the control button and select the rectangle and each circle. Then go to the drawing section and select group. This makes them as one shape that you can move it around.
Step 5: Add the flowers
Choose a picture of flowers or appliques that you would like to use and crop using any photo software. Click insert and select pictures, then search for the photo and select insert. Right click the photo and select wrap, then select in front of the text. This will allow the flowers to be placed anywhere in the file. Move it around until you are comfortable. On the actual cake I am going to use the flowers, but not the leaves.
Step 6: Add the bow
To create the bow, I create the tail first. This could also be the bottom of the dress. Go to the insert tab and select shapes again under basic shapes select the trapezoid shape. You are going to need two. Change the color to white and make it a little bit longer than the bottom tier. Then use the arrow and turn to the right a bit. Make a copy and turn to the right. They should overlap with each other.
Then select the teardrop shape from the basic shape section. Size it and make a copy. Turn it around for the opposite end. This will be the bow. Add a brooch from online or if you are crazy like me you copy twenty small circles and arrange them like a brooch. 
Step 7: What medium are you going to use?
For this design, I used text boxes to plan out all the details. I am going to use fondant, edible fabric, and some royal icing. 
Finally, the gather all the materials you are going to use. Look through your cake stash and see what you have that can be used. I am recommending the following three items for now. But, you can use whatever you have that is close.
That’s it for now. Don’t forget to share the love and pin for later. Stay tuned for wedding cake part two.
Related Posts
The Best Pistachio Cake from Scratch with Pistachio Buttercream
Do you like pistachio ice cream? I do, it’s one of my favorite flavors. That’s
April 2, 2021
How to Make a Macaroni and Cheese Cake
This week I am switching things up a bit. Today I have a tutorial on
January 24, 2020
Claire | 15th Jun 19
This is excellent, thank you for sharing your knowledge ?
G | 15th Jun 19
Claire thank you so much. I am happy to help.