How to Create a Hand Painted Cake inspired by Orchids
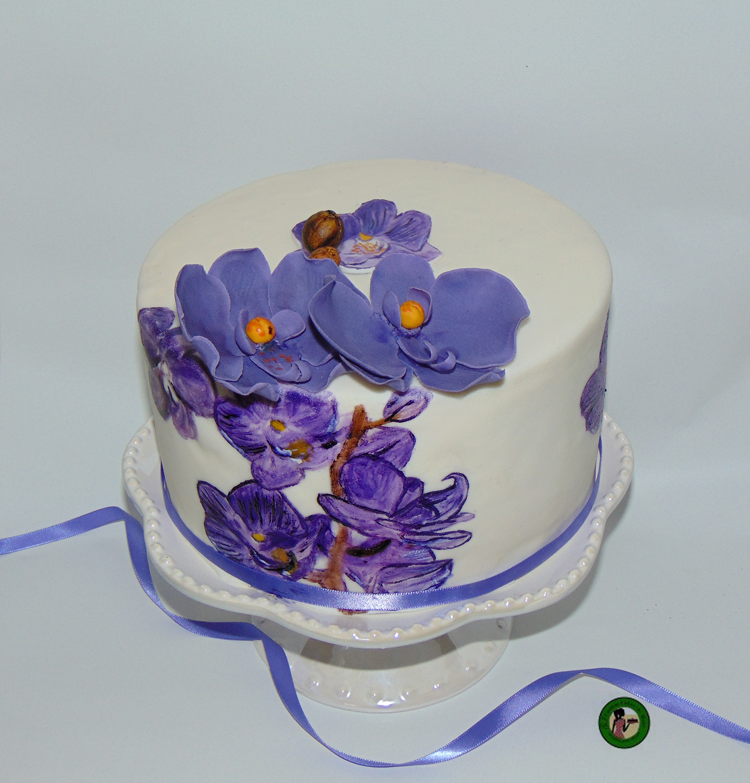
I cannot get enough of this hand painted cake trend, they are absolutely beautiful. I recently caught the hand painted cake bug. Therefore when my mom celebrated her birthday this past week and I could not wait to try this method on her cake. For this hand painted cake, I decided to paint orchids because my mother loves them. I chose this flower as my inspiration.


This page may contain affiliate links which mean that if you make a purchase from any links directed from this website I may earn a small commission. I only recommend things that I use and love and classes I have taken. Thank you very much for your ongoing support.
My preparation
Before we go any further, I feel like there should be a disclaimer because I am not a painter, nor would I consider myself great at drawing. My younger sister Toya received all that talent. My talent for painting came a tad bit short. So the question is why teach a tutorial on hand painted cake? Well, because you don’t need to be any of the above to create a hand painted cake. Do you trust me when I say it’s easy? I know you do.
Making a hand painted cake is easier than you think. With the proper tools, you can recreate any picture with this tutorial.
While I was preparing for this project, I was trying to think of a time when I actually painted. I could not think of anything (gasp). How did I make it through my childhood without painting? But, that’s a question for another time. I have, however, taken a basic drawing class in college (that makes me somewhat qualified right?) and it was the only easy A class that I never received an A, next to Calculus and my Accounting classes. Shocking right? This often became a topic of interest on job interviews. In hindsight, I think it’s funny. Anyway, I digress. I have attempted to doodle pictures over the years including my mothers day project sea turtle cake with my son. My point is if I can do it so can you.
Supplies needed for your hand painted cake:
- Pencil
- Parchment paper
- Simple photo
- Paintbrush fine details (round pointed brush, flat brush, and detail round brush)
- Paint palette
- Edible gel colors
- Lemon extract or vodka
- Shortening (our secret)
- Cup of water
- Cake covered in fondant (the cake needs to be firm i.e. you should not be able to get any fingerprints when you touch)


Step 1: Plan ahead/picking design
When creating a hand painted cake it is very important to plan ahead. Take this time to not only plan the design but print and then measure it against your cake. Gather all your tools i.e. paint, paint brushes etc. Also, check the bristle on your brushes and make sure you have the right sizes. I have an array of brushes from the Wilton brushes to the ones for art supplies (wash your brushes thoroughly before use). In addition, choose a design that is very simple and easy especially if this is your first time. Designs that are easy have only a few lines to copy. You will thank me later.
Plus, make sure you have the right size template for the height of the cake. As a mention before, measure the photo against the side of the cake and trim accordingly. This is an important step. The photo I chose was too tall for the cake, therefore, I trimmed the bottom portion. I wanted the design to flow up to a branch with the gum paste orchids as the top of the branch.
I also made sure I had the proper paint and paintbrushes. I used brushes from my acrylic nail art paint brush set and Wilton brush set that I purchased a few years ago. The paint brush set had many fine detail brushes and I absolutely love them.
Prepare Paint Brushes and Mix Paint
If you are using gel colors, add some lemon extract or vodka to the gel color and mix until you have the right consistency. The best consistency is not too thick and not too runny. Americolor gel colors have the right consistency, but you might have to lighten the color.
I was over the moon ecstatic to try the new edible art paint. I bought a set on Etsy and I love them, they come ready to go, just a quick shake is needed. No need for vodka or lemon extract.
Step 2: Tracing design on Parchment Paper
Remember when I said choose a simple design? This is the main reason because you are going to trace the design onto parchment paper. Don’t worry if you are not an artist like me tracing the design is super easy. Use a very sharp pencil and trace the photo underneath.

The most important thing to remember when tracing your design for your cake is to flip it. Either print your design flipped or turn the printed paper over. A neat trick to see the photo underneath is to apply some shortening on the back and it will show clearly. If not you can always invest in a lightbox. Psst… While you are getting one please remember me. Thanks in advance. Just kidding.
By the way, I learned the importance of flipping my design the hard way when I made this Snoopy lunchbox cake for my friend Katie. I was so eager to create the cake I totally forgot to flip the photos and words *sigh*. It was after I traced everything to parchment paper and placed the first parchment unto the cake I realized I needed to reverse the design duh.
In the end, I opted to place the printed paper on a thin piece of fondant and attach it to the cake (by the way this was much easier). This worked really well because she was able to keep the messages we made for her. Phew… I am trying to make sure you don’t make the same mistake I made.
Your traced design should look like this.

Now that we have that our design traced, paint brushes and paint mixed, we are ready to hand paint on a cake.
Practice makes perfect. Before you transfer your design the cake it is the best to try it on a piece of dried fondant. That way you will know for sure that the colors work fine and get comfortable painting. Here is my practice version.
Step 3: Transfering design to Cake
Before you transfer your design, the first you need to do find the front of your cake. Then apply some shortening to that section of the cake. You only need a small amount. Then remove the excess shortening with a paper towel. I traced my design on the front and the back of the cake and added a single orchid on the sides.
Once that is complete, place the parchment paper with the pencil side on the cake. Then trace the design on to the cake. Make sure your pencil is sharp.
You should have only a slight trace of the pencil. Now it is time to outline your design.
Step 4: Outline the design on the cake
Outlining is where the fun begins. Using your round tip outlining brush and lightly dip into the paint and begin outlining. Test the amount by tapping on your paint palette or your test fondant. Try to do one line at a time. It does not have to be perfect. You are going to go over it again. 
Complete for the entire design. You can go around a second time to make the outline much darker. See… It’s that bad right… Now it is time to paint.
Step 5: Begin Painting Cake
Using the small flat brush begin to fill in the flower. Once again using small brush strokes. My advice is to always paint in the same direction and always check the amount of paint on the brush. The more paint you add, the darker the color will be. Continue to do this until you are finished.
When you are finished and the first coat of paint is dry you can go back and do one final outline or add more color. This is also a good time to add whites or other colors if that is part of your design. That is how you make a hand painted cake. 
I absolutely enjoy creating my mom’s hand painted cake. How about you? Have you ever created a hand painted cake before? What was your experience?
 PS. If you love this tutorial and the other tutorials that I have done. Don’t forget to share with your friends and pin for later. Until next time happy caking. Other posts you might love:
How to make Rolled Buttercream Fondant
How to make Marshmallow Fondant
Top 10 tools every cake decorator should have

[powr-social-media-icons id=f1f953e1_1516972268313]
Related Posts
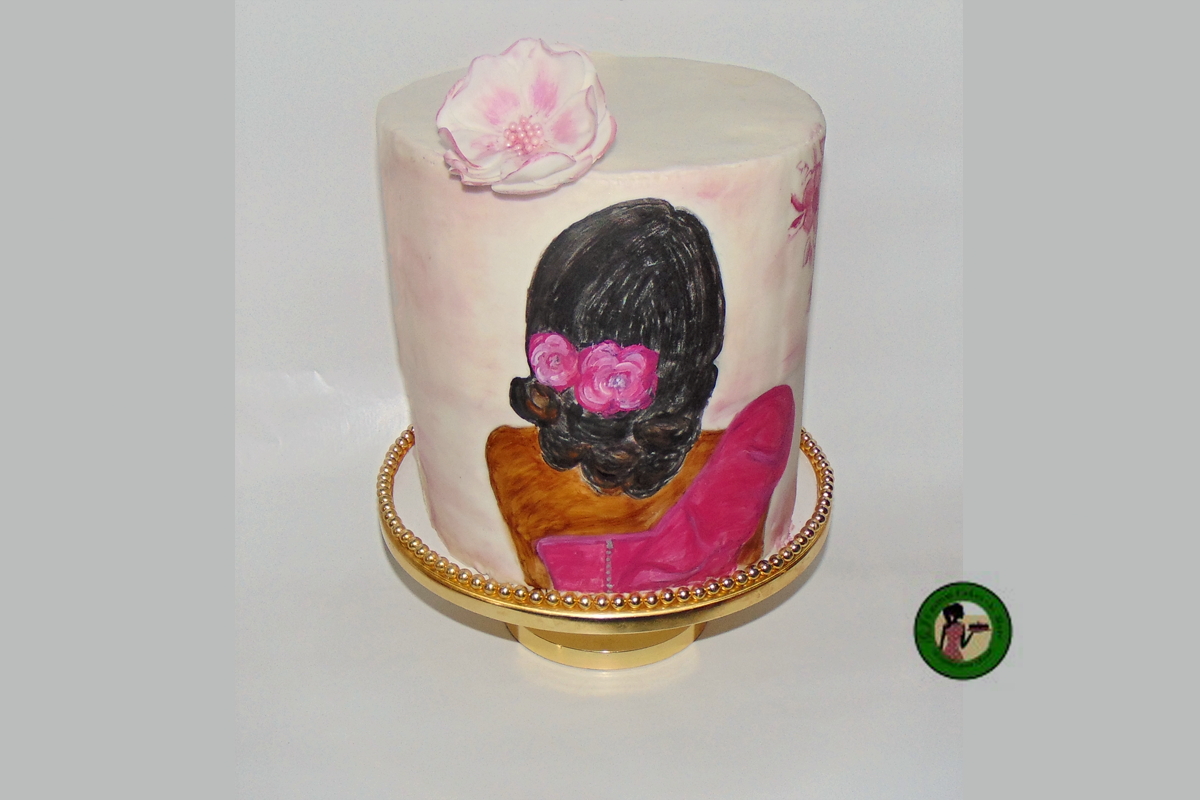
Hand Painted Cake + Easy Fondant Flower Tutorial
Every now and again I get in the mood to create a cake that is
February 2, 2018
lilly | 28th Jan 18
p.o.box 388
lilly | 28th Jan 18
fantastic
G | 28th Jan 18
Thank you