British Flag Teapot Cake
British Flag Teapot Cake
I am very excited about this blog post. My friend MG asked me to make a British Flag Teapot Cake for a bridal shower. The bride-to-be loves everything British and chocolate. I could not wait to take on the challenge. I like teapots and every once in a while I sing the teapot song. Anyway I digress.
Making the Cake
For the teapot cake I made my delicious chocolate mud cake, with nutella Italian Meringue buttercream and a chocolate nutella ganache. The cake is rich and chocolatey and did I mention delicious. I made two 8 inch spheres for a perfect circle. I torted each sphere and filled with the nutella Italian Meringue buttercream filling. This is hands down one of the best filling I made, it’s fabulous. It takes alot to walk away from the bowl and not get an ice cream cone.

While the cake was firming up in the refrigerator, I prepared the fondant, which was colored in royal blue. In addition, I cut out strips of red fondant and small white strips for the flag. Once the filling was settled, I placed the bottom tier on the center dowel of the cake board. Then added a few more dowels, some frosting, a cake board, then the top tier.
Afterwards I carved the cake to get a tapered look at the bottom of the cake. Honestly you can get really carried away here. When I was happy with the result, I added the delicious chocolate nutella ganache. It was finally time to decorate the cake.
The Cake Board
I prepared the cake board in advanced by placing a small styrofoam base and center dowel through the base and the board. I certainly did not want to take any chances. No rolling teapot here. The cake board was a half inch foam core board added to a regular Wilton cake base to get the height for the scalloped border.
Tip me over and pour me out (the spout and the handle)
Now a teapot is not complete without a handle and a spout. The spout and handle had to be proportional to the cake itself. Therefore, I drew a teapot the size of my sphere, then sketched the handle and sprout from my inspiration teapot. The drawing served as my template to create the spout and handles. 
I made these items in advanced from fondant mixed with some CMC. Unfortunately I do not have any pictures of these items.
Putting it all together
At this point I felt like I accomplished a lot and could not wait to put all the decorations on the cake. I added the spout and the handle, then started to add the red and white strips. However, I believe I was way too confident, because my handle started to break… *sigh* No problem, after my third attempt to fix the handle, I decided to make a new one. Then the sprout started to tip over. I secured the sprout with a dowel and placed a piece of fondant underneath. Phew…. I went back to adding the fondant strips.
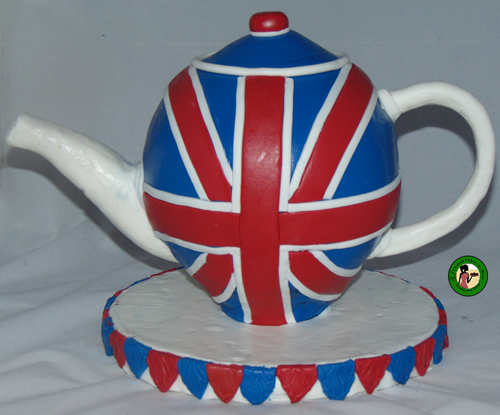
I then decorated the cake board with a scalloped red, white and blue fondant border and the top of the board with white fondant. This process took way longer than I had estimated. But the teapot cake was complete. A different angle of the cake.
Nevertheless, I enjoyed making this cake.
The Ultimate Guide to Chocolate Ganache - Wow! Is that really edible? Custom Cakes+ Cake Decorating Tutorials | 20th Apr 18
[…] this easy. I have not looked back since. While I mostly used it for my carved cakes such as the British teapot cake and the violin cake I sometimes use it for a very simple cake such as my Mr. M & M cake. […]