St. Patrick’s Day Pot of Gold Cupcake
Top o’ the mornin’ to ya. I have been wanting to say that ever since I decided to make this pot of gold cupcake tutorial. St. Patrick’s Day is around the corner and it dawned on me that I don’t have any St. Patrick’s Day cake or cupcake on the blog. Zip, zilch, nada. So, today I am changing that; I am going to show you how to make a 3D pot of gold cupcake using buttercream.
When I was planning this post, I was torn between buttercream or fondant. However, while I was smoothing out the buttercream, I realized it didn’t need fondant. Nevertheless, I did use fondant to make the gold coins because I couldn’t find edible gold coins anywhere. To make the pot of gold cupcake, we are deconstructing the cupcake and essentially making a mini cake. Wait, what…Why? It was the only way to make a 3D pot of gold.
This page may contain affiliate links which means that I may earn a small commission if you purchase from any links directed from this website. I only recommend things that I use and the classes I have taken. Wowisthatreallyedible is a participant in the Amazon Services Associate Program. As an affiliate of Amazon, we place custom links in blog posts (such as this one). Thank you very much for your ongoing support.
Materials for Making the Pot of Gold Cupcake
For this project, I used regular American buttercream (ABC). Now, I know I usually use Italian Meringue buttercream, but ABC is the best way to go for this project. Plus, it is easier to color American buttercream, than Italian Meringue and it forms a crust. I used a chocolate cupcake and filled it with buttercream and caramel. Yum!
Materials you are going to need:
- Black buttercream–You are going to need a medium consistency buttercream, see recipe below and step-by-step here. To make black buttercream you will need black cocoa. I have only used King Arthur’s brand for this, but I am sure they would all work the same way.
- Chocolate cupcake–I used my delicious chocolate recipe, see the step-by-by step here.
- Caramel sauce filling– I like using homemade and usually make my own, you can find the caramel sauce recipe and tutorial here
- Gold fondant–Satin Ice makes a gold sparkling fondant, but you use marshmallow fondant and paint it gold.
- Piping bags (2)-You will need a large piping bag to use the Wilton quick icer (which is optional) and a tipless bag for the handles, legs, and hanger.
- Paintbrush– The paintbrush is used to mark the neck of the cauldron. A small paintbrush is best because of the size of the cupcake.
- Wilton tip 789 (optional)-TheWilton quick icer (Wilton tip 789) adds just the right amount of buttercream without the need for a crumb coat. However, if you didn’t want that much icing on the cupcake you can add the amount that you need a little at a time.
- Spatula–Any small spatula or palette knife will do.
- Flexible smoothers or acetate–To smooth the buttercream you will need either a flexible smoother or acetate. You can also use a Viva paper towel. I didn’t have any in the house, so I used both the acetate and the flex smoother.
- Small circle cutter–I used the smallest cutter from the Ateco set to make the edible gold.
- Small rolling pin–You will need a small rolling pin to roll out the gold fondant.
- Mat–You will need a small mat to roll and cut out the fondant.
- Rainbow airheads
How to make the Pot of Gold Cupcake
Now that you have gathered the five thousand materials, it is time to make the 3D pot of gold. Because we are building a cauldron, we are going to need a make a curve in the cupcake. To do this, add enough icing to the outside to get the right shape.
- Roll out the gold fondant and use the small circle cutter to cut as many circles as possible.
 Cut the cupcake in half. Place some buttercream on a small cake circle or a plate. I added the buttercream on parchment paper to make it easier to move for easy clean (at least so I thought).
 - Then add the first layer of cake.
- Add the buttercream and the caramel sauce. I totally forgot to take a picture of the caramel.
- Then add the next layer on top.
- Fill the large piping bag with the black buttercream and frost the top and the side of the cupcake.
- Use a spatula to smooth the buttercream, then switch to the acetate or flex smoother. Couldn’t avoid the mess no matter how hard I tried. You will have a lip at the top, leave it, we will need that later to hold our gold coins. Place it into the refrigerator for about 20 minutes.
- Remove from the refrigerator and smooth the sides some more. This time from the bottom to the top to shape the pot. Use the paintbrush to place the indentation for the neck of the pot.
- Now use a knife to remove the rough edges at the top of the pot/cauldron.
- Use the paintbrush to make some definition of the edge on the inside. Continue to smooth until you are satisfied.
- Fill a tipless bag and pipe the two handles, and the hanger in the front. Then pipe the feet. If you notice, the top isn’t smooth, it doesn’t need to be because it will be covered. Just make sure there is enough space for the gold coins.
- Place a toothpick in the rainbow airhead and insert it into the pot. At this point, it is very flexible. My mom pointed out that it will harden if you leave it out. I strongly suggest placing it in the shape you like before adding it to the cupcake.
- Keep adding the gold coin, until you have filled it all the way to the top. Place a small amount of water to make them stick together.
- This was my test to see how many gold coins I needed to use. I did this before the step above.
- At some point, I cut the airhead, but, realized afterward I shouldn’t have. Don’t you love when that happens?
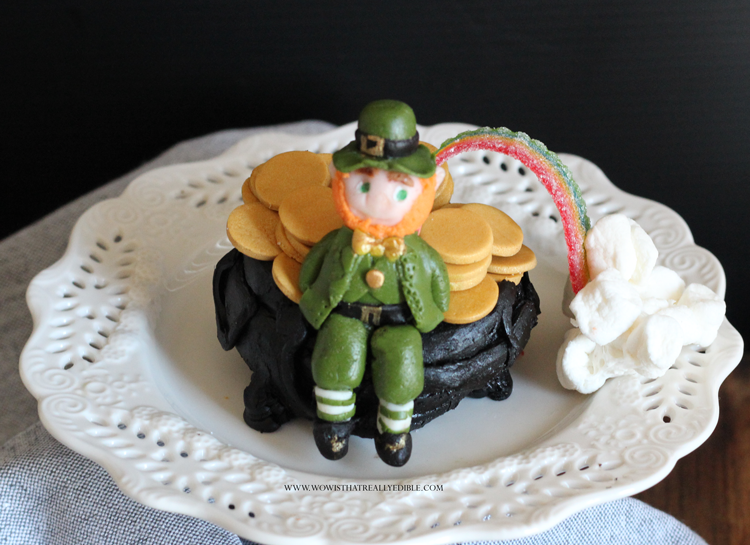
- I decided last minute to add a Leprechaun (sorry the tutorial is already long so I didn’t add how to make him) and marshmallow clouds. Consequently, I had to move my rainbow to accommodate him. He has got his hands stuck in the pot.
- The perfect treat for your St. Patrick’s day virtual party.

 Cut the cupcake in half. Place some buttercream on a small cake circle or a plate. I added the buttercream on parchment paper to make it easier to move for easy clean (at least so I thought).


The Best Chocolate Cupcake Recipe from Scratch with Black Buttercream
Ingredients
Chocolate Cupcake
- 1 cups granulated sugar
- 3/4+1/8 cups all-purpose flour
- 1/4+1/8 cups cocoa powder
- 3/4 tsp baking powder
- 3/4 tsp baking soda
- 1/2 tsp espresso powder
- 1/2 tsp salt
- 1 large eggs
- 1/4 cup canola oil
- 1/2 cup buttermilk
- 1/2 cups boiling water
- 1 tsp vanilla
Black Chocolate Frosting
- 1/2 cup black cocoa powder (I use King Arthur's)
- 4 cups confectioner’s sugar
- 1 stick butter 1/2 cup
- 2 tbsp heavy cream
- 1 tsp vanilla extract
Instructions
Directions:
One Bowl Chocolate Cupcake:
- Heat oven to 350 ̊F. Line muffin pan with cupcake liners.
- Stir the flour, sugar, cocoa powder, baking soda, baking powder, and salt in a bowl.
- Add the eggs, buttermilk, oil, and vanilla, mix together, then add the boiling water. Mix until combined.
- Bake 10-12 minutes or until a toothpick comes out clean.
- Cool completely before adding frosting.


Chocolate Frosting Filling
- Beat the butter until white and fluffy
- Add the cocoa powder and confectioner’s sugar.
- Then, add heavy cream and the vanilla extract. Add more heavy cream if the frosting is too stiff.
- Let it sit for a few hours to darken.


Related Posts
Easter Cupcakes|Bunny Ears Cupcakes
How cute are these Easter cupcakes? This Easter I wanted to create something different than
March 26, 2021
Peach Cupcake with Peach Swiss Meringue Buttercream
This peach cupcake is for sure one of the best recipes I have made to
March 22, 2021