Royal Baby Shower Cake with Crown Tutorial
Baby shower cakes are cute and fun. It is a celebration of the new life being brought into the world.
I had the honor of making a royal-themed cake for a baby shower. It was a two-tiered royal blue cake with gold borders and a gold crown. To make it even sweeter, I made cake pops and cupcakes (red velvet and vanilla) to complete the beautiful dessert table. The decor at the shower was absolutely beautiful and matched the colors on the cake. I’m sorry you will have to take my word for it (more on that later).

I was very excited to make this cake, however, making the cake did not come without its challenges. I ended up making a total of three crowns. The first crown (a regal crown) crumbled after we tried to cut the Styrofoam ball from underneath. The second crown was picked up prematurely on the morning of the event. Therefore, I had to rush to make a third crown. Thank God…. for pastillage and a simple crown design.
The final crown was super easy to make. However, making the third crown pushed everything off schedule. I was so focused on getting to the venue, that I forgot I hadn’t taken my camera. To make matters even worse, I did not have my cell phone to take pictures either *sigh*. I was able to get a few pictures from my sister who attended the event. Enough about that, here is how I made the Royal Baby Shower Cake with a crown tutorial.
Making the Crown
To make the crown, I used my go-to pastillage recipe. Pastillage was perfect for this project because it dries quickly. My original crown would have been perfect, but I needed something easy to make. I used the template below to make the crown.

Items needed:
1 recipe of pastillage or gum paste
Template for the crown
Rolling pin
X-acto knife
8-inch cake board (optional)
A round container (I used a large oatmeal canister)
Wilton Jewelry Mold
Wilton Damask Fondant Mold
Wilton gold color mist
Mod Podge Mod Mold Royal Icons
Global Sugar Art Egyptian Gold Luster Dust
Paintbrush
Step 1: Print and cut out the template
Print the template above and cut it out using an X-acto or a scissor. The template is perfect for a large crown using three parts. To make a smaller crown use two pieces of the template.
Step 2: Roll out pastillage
Roll out the pastillage or gum paste to about 1/4 inch thickness (or thicker) 16 inches long and 5 inches wide.
Step 3: Cut out the design using an X-acto knife
Using an X-acto knife, cut out the pastillage or gumpaste using the template. Pastillage dries fast, therefore you will have to work quickly. Cover the unused area with plastic wrap. Quickly turn over the cutout to stand on an 8-inch cake board. Then use a canister to help the crown keep its shape. Remember to add shortening or wax paper to the canister to keep it from sticking to the canister. If you are in a hurry, allow the crown to stand a few minutes then remove the canister. Otherwise, let the crown dry before you add any decorations. For gum paste, this could take a few days. However, for pastillage it 


Step 4: Decorating the Crown
This is the most exciting part. Begin by making six fleurs-de-lis from the Mod Podge Mod Mold Royal Icons and glue to the larger fleur-de-lis using pastillage gel (which is pastillage mixed with water).  Then create a small pearl using the Wilton Damask Fondant mold, then glue it to the crown. I used royal blue and red fondant or pastillage to make the crown jewelry with the Wilton Jewelry Mold. Be creative and have fun.
I also added another piece from the Mod Podge mold on the shorter portion of the crown. Once I was finished adding the jewelry, I sprayed the crown with the Wilton gold color mist to get a light golden color. Then mix some Egyptian gold luster dust from GSA with vodka or lemon extract and paint the crown gold. I waited until the crown was dried before adding a second coat. Do not move the crown until it is completely dried and make sure the crown is on a board so that you can move around. That is it. See… it is very easy, right?
Let’s Talk Cake
As I mentioned before, the cake was a royal blue tiered cake made with red velvet and vanilla flavor. They were 8 inches and a 10-inch round. To achieve the royal blue color, I used Chefmaster royal blue food color gel. By that, I mean a lot of the royal blue color gel. I let the fondant sit overnight for the color to deepen. After I covered the cake with fondant I added some shortening and dusted it with Global Sugar Art (GSA) edible hybrid royal blue luster dust. Because it is summer and there is a risk of condensation I did this immediately (learned my lesson with the black and gold cake). I dowelled the bottom tier and glued it with some royal icing.
The Border
To make the border for the cake I used marvelous mold fleur-de-lis mold by Elisa Strauss and Wilton Damask Fondant Mold. It is great because it lines up perfectly. I added some tylose powder to some yellow fondant and rolled out about eight to ten pieces and painted them with edible gold paint from GSA. Using the Wilton Damask mold I used the medium part to make the design around the top of the cake. I painted these as well with edible gold paint and put them to the side to dry. I added them very carefully to the side of the cake by making a pattern.

Finally, the cake was complete, but, I had to wait a little bit more for the crown to dry. I carried the crown to the venue on my cake lifter. One because I did not want to touch it and risk it breaking. As an extra precaution, the crown was nestled in between the cake box and the box of cupcakes with a piece of non-slip mat. Because I am over-cautious, I packed the cake using the steps from my post “5 Secrets to Delivering Cakes Safely.” I had to drive 20 miles with the cake and I was nervous.
I went through the checklist in my head over and over again to make sure I covered all my bases. Once I got to the venue it was the moment of truth. Everything arrived in one piece. I was relieved. Another cake success. Send us a comment below with all your cake stories. ![]()

This page contains affiliate links which means that, at no additional cost to you, I may earn a small commission if you make a purchase. Thank you very much for your support.
Related Posts

The Making of a Gravity Defying Canvas Cake
Last week I had the honor of making a gravity-defying canvas cake for Catalina’s Bat
February 7, 2020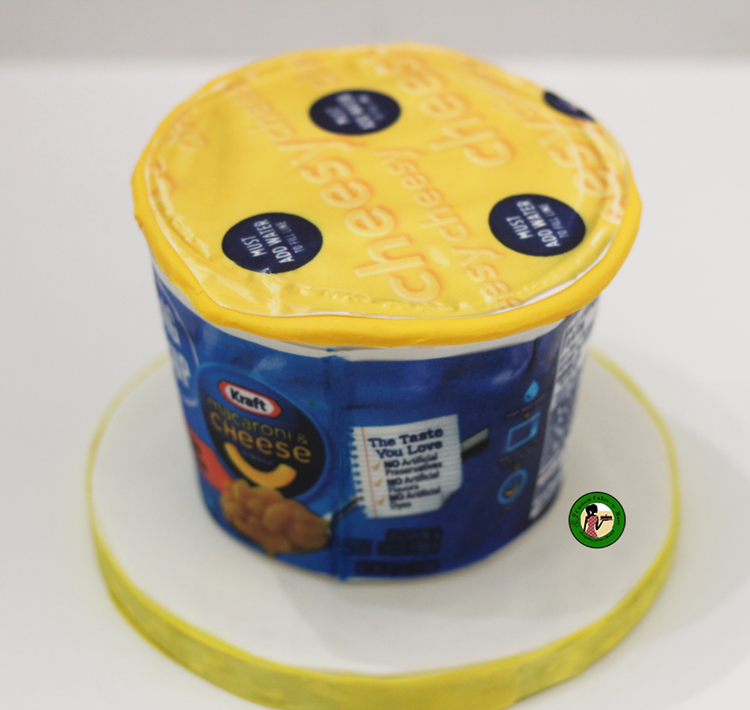
How to Make a Macaroni and Cheese Cake
This week I am switching things up a bit. Today I have a tutorial on
January 24, 2020