Princess Baby Onesie Cake + Fondant Elephant Topper Tutorial
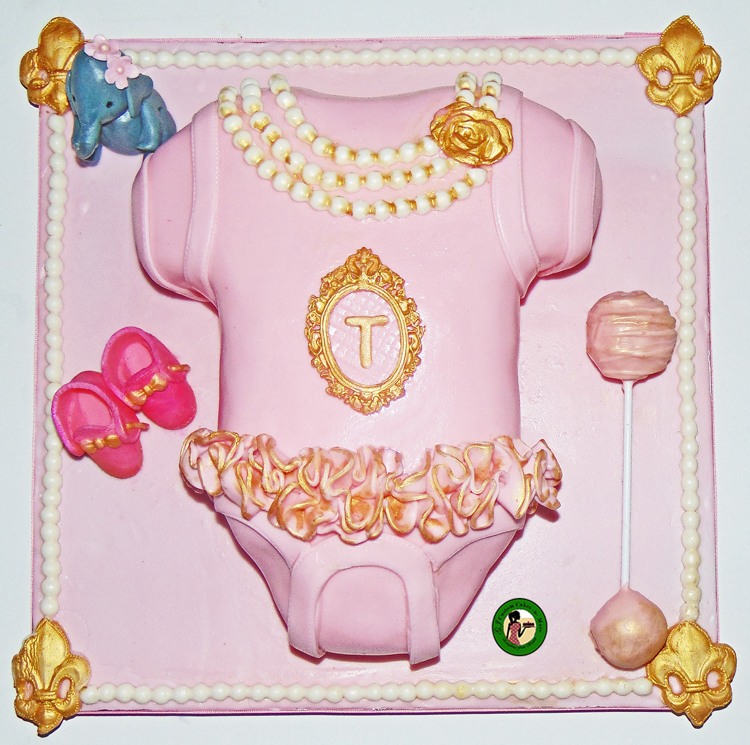
Last week I made a princess baby onesie cake for my co-worker who is expecting a baby girl. The baby onesie cake was complete with a cake pop rattle, baby booties, and a fondant Elephant topper. The baby onesie cake was complete with fondant pearls, ruffles, and fondant flowers. It’s not very often I get free reign to decorate a cake. Everyone loved the design thank goodness, but this definitely could have gone sideways where no one liked the cake. That is a lot of pressure for one person, so I asked my lovely co-workers to vote. The inspiration for the design came from my co-worker who is a fancy/sophisticated person which is the main reason I added ruffles and pearls. Who doesn’t like that right?
This page may contain affiliate links which mean that if you make a purchase from any links directed from this website I may earn a small commission. I only recommend things that I use and love and classes I have taken. Thank you very much for your ongoing support.
Making the Princess Baby Onesie Cake
Cake
For the cake, I used my red velvet cake recipe with cream cheese frosting. Now, everything was fine with the pink color, until I added the wet ingredients to the dry ingredients. It totally slipped my mind the effect of the cocoa powder with pink. Once the batter was combined it became a really dark pink color, closer to red. As I was working on a three-day timeline I couldn’t whip up another cake batter.  So I carried on with what I had. After all, no one seemed concerned about the fact that the color on the inside was not pink (which I was happy about) and I tried not to make a big deal about it. Shhh!!!
Carving the Cake
This red velvet recipe is very moist and is not ideal for carving, but I love to push the envelope a bit. I knew the cake was laying down which makes it better. I baked one layer of the cake in a 9×13 pan and once it was cooled, I wrapped it in plastic and placed it into the refrigerator. It is much easier to carve a cold cake, even one that is as fragile as this one. I baked the second layer just in case I did not have the height I was looking for.
Then, I placed the two layers on top of each other and carved the onesie using the template I created (you may access the template in our free resource library).  I made the cut out using an up and down motion. I built the arms of the onesie using the extra cakes. Then I used the template one more time to cut out the arms. I also trimmed down the edges of the cake to give it a rounded edge.
Because the cake was so fragile I used a 9×13 cake board to lift up the top layer. I filled the cake with pink cream cheese frosting, being careful not to add too much to the edge. After that, I used the Wilton quick icer (see how I used it here) to add the pink Italian Meringue Buttercream to the outside of the cake. Using a flexible smoother, I smoothed from the bottom up to keep the rounded edges. When I was satisfied with the smoothness, I placed into the refrigerator.
Decorating the Cake
Once the frosting was set, I trimmed the cake board to the shape of the cake. Next, I covered the cake with my homemade Marshmallow fondant that I colored pink. I made sure the fondant covered all the way over the cake board.
Fondant Decorations

For the fondant decorations, I used the Wilton pearl mold to make the pearls for the board and the cake. I also used it to make the rose, I inserted the fondant part of the way to get the impression and then colored it with edible gold luster dust mixed with vodka. Don’t worry the vodka evaporates. The ruffles were made by cutting out pink fondant with a medium-size circle cutter, thining the edges with my finger, and pinching them together. See the steps below for the fondant elephant. The colors are a bit different, but you get the idea.
Making the Gum paste Baby ooties
To make gum paste booties, I made some gumpaste using the Wilton gum paste mix that I colored pink. Using a template I found on the internet, I made cut outs for two booties.

I used a stitching tool for the details around the edges. Once I formed the shoe, I dusted with some pink luster dust.
How to make the Fondant Elephant Cake topper
One of my friends asked how I made this topper which is super easy by the way. It took a mere 20 minutes to make. The fondant elephant is super cute too. Here you go…
Materials:
- Dark grey fondant (mix a small pinch of black with white fondant)
- Pink fondant (you can use either my buttercream fondant recipe or my new favorite marshmallow fondant)
- Tylose powder
- Small plunger flower cutter
- Small heart-shaped cutter
- Edible pink sugar pearls
- Ball tool
- The little bit of water
- Two toothpicks
- Black edible marker
Making the body and legs of the Elephant topper
If the fondant is not mixed already, combine the black and white fondant until there are no streaks in the fondant to create grey. Then add tylose powder and let it sit for a few minutes. Make two balls about 2 ounces and 1.5 ounces respectively. Shape the largest ball into a pear shape. Dip two toothpicks into the water and insert into the shape. This will be the bottom or body of the elephant.
To make the legs, roll four pieces of fondant into a ball then roll them into log shapes. Make sure they are all the same sizes. Using your fingers pinch the top to mimic the feet. With the ball tool, add four spots to the body with two on each side.  Add a touch of water and place each leg in the indent made by the ball tool. Smooth out the legs and make sure it is blended in with the body. I suggest adding the bottom legs first, then the top.
Making the head of the Elephant topper
To make the head of the topper take the smaller of the two balls and roll until smooth. Then take pinch a small piece in the front pulling out the trunk. Pull out until it is larger in the front and smaller at the end. Curl the top of the trunk. Using a knife or a Dresden tool open a small section under the trunk for the mouth. Shape with your hand until it looks like a “V.” Add three marks where the trunk turns up to get the impression of ridges on the trunk. Using edible markers mark two places for the eyes.

How to make the Elephant Ears and flowers
To make the elephant ears roll out a piece of the grey fondant and cut out two pieces using a heart cutter. You can thin the edges of each piece and add to the side of the elephant head so that it drops on the top legs. Attach with a bit of water.
Use a small flower plunge cutter make two or three small flowers from pink fondant. Push the plunger down to create the impression on the flower and using a ball tool place an indent in the center of the flower.  Add pink edible pearls to the flowers
  Then attach the flowers to the head of the elephant with a bit of water.