How to make a firecracker cake
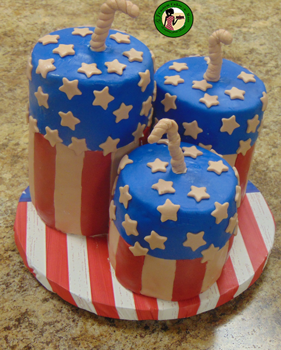
4th of July (Independence Day) is one of my favorite holidays, why? Because it means summer, BBQ and fireworks and who doesn’t like that? This year I was trying to decide what kind of cake design to make for the 4th. Of course, there are a lot of designs to choose from including the very popular flag cake. However, I wanted something different. As always I ask for suggestions. One of my friends MAC suggested a large firecracker cake. I loved the idea… The next thing I did was look for photos to decide which firecracker design to make. I found many photos, including lots of dessert ideas, shockingly the inspiration I found was not actual firecrackers, but firecracker centerpieces.

This page may contain affiliate links which mean that if you make a purchase from any links directed from this website I may earn a small commission. I only recommend things that I use and love and classes I have taken. Thank you very much for your ongoing support.
I was inspired by this firecracker centerpiece I found here at chickenscratchny.com. 

And the design of this firecracker centerpiece found here

Items you will need to make the Firecracker Cake:
- Two 9×13 cakes (make sure it is a sturdy cake recipe)
- Buttercream (about 9 cups)
- Blue fondant
- Red fondant
- Light brown fondant or white
- One ten inch cake board used to cut out three small cake boards
- A 3-inch cake board
- Dowels at varying heights
- Wilton circle cutter (I used the 4inch circle cutter)
- 10 or 12-inch cake base
- A small and large offset spatula
- An American flag tablecloth or extra fondant and ribbon for cake board.
Step 1: Baking the cake
Bake the cakes according to your recipe and instructions. If you choose to make the flag colors, you can divide the batter and color one part red and another part blue. When the cakes come out of the oven, use a wet paper towel (squeeze out the excess water) and a square cake pans or a cake board to level the bump on the top of the cake. Make sure the cake is very sturdy because we are going to make them into smaller cakes and I am afraid a regular boxed cake will crumble under the fondant.
Step 2: Cutting out the cake board
Trace three 4 inch circles on a 10-inch cake board using the Wilton circle cutter. You can also use a protractor if you do have a circle cutter. These 4-inch circles will become your cake board. Then cut out a 3-inch cake circle for the taller cake. Place a hole in the center of the 3-inch cake board. See pictures below.


This is a good time to decorate the cake base. I did not have a 10-inch cake base available so I made my cake base from 1/2 inch foam core. I then covered my board with an American flag tablecloth that I bought from Party City. This was my first time using this technique as I usually cover my cake base with fondant. I absolutely loved this technique, especially because I did not need a ribbon or had to worry about getting fingerprints on my board. I added four small pieces of foam core under the bottom of the board so that it was easier to lift. The final board.


Step 3: Cutting out the cake circle
Once the cakes are cooled, use the Wilton 4 inch circle cutter to cut out cake circles. You will need thirteen pieces to make your cake look like mine. I was barely able to get thirteen pieces and had to piece a few cakes together. If you are not comfortable doing this, just bake an extra 9×13. Now is the time to make sure the cakes are leveled.
For the first firecracker cake use six cake circles. This cake is a smaller version of the popular double barrel cake, therefore, you will need dowels and a smaller cake board. Place the dowels in when you get to cake layer number four, then add frosting and the smaller cake board. Then add a dowel through the center. If not, the cake can crumble underneath. I did not place any dowels at first and the cake started wobbling.
For the second firecracker cake use four cake circles and use three cake circles for the third cake. The idea is to have the cakes at varying heights.
Place all the cake circles to the side, however, remember the order of the cakes. If you are like me and you forget, just place a toothpick in each cake layer in a straight line and this will help. This is especially helpful when you tort a cake and it is not cut straight.
Step 4: Fill and Frost
Normally when I am making cakes, I either use the Wilton quick icer or the ‘G’ method (upcoming post) to make it nice and smooth which does not always receive a crumb coat (shock). This case was very different. Hence, fill and crumb coat each cake then chill. After the cakes are crumb coated, add another coat of frosting and chill. See crumb coat below of a smaller tier.

Step 5: Putting it all together
Once the cakes have been frosted and chilled, it is time to add fondant. My inspiration photo had burlap which is tan, therefore, I added a little brown to the white to make it close to the photo as possible. To make things easier, just use plain white fondant. Cover each cake individually with blue fondant on top and the red and white or tan stripes on the bottom. Roll out each color fondant to about a 1/8 of an inch. Add the blue fondant to the top of the cake, then measure and cut the fondant with a Xacto knife.
Then comes the fun part, cut out one-inch strips of red and tan fondant and alternate around the bottom half of each cake. In addition, cut out small stars for the top of the cake. Add the stars on the blue section of the fondant.
The good news is you get to do this two more times.
Once completed, place some buttercream on the cake base then place the three cakes on the cake, organize to your liking. Another good choice is candy melt, however, you have to move quickly because it dries fast. Congratulations, you are done…
If you like, you may add a burlap-textured fondant around all three cakes. I decided not to do this because I did not want to hide all the hard work. The final result. Happy caking.


Finally, it is time to eat cake. We had to cut into this beauty.

