Learn to Make a Christmas Ornament Cake Like the Pros
Sometimes you have to step outside of your comfort zone and do what makes you feel uncomfortable.
Last week I did the ultimate, I entered a cookie contest in our town. I have always wanted to enter but made so many excuses. This year I took the plunge. I was so nervous, I baked and tasted so many cookies by competition day I had no taste buds left. Ultimately, I entered the adult competition and I WON. The prize, a gift certificate for ice cream.
The bottom line, I felt great and was inspired. As a result, I decided to make a Christmas ornament cake.
I love beautiful ornaments and try to get cute ones for our Christmas tree. This time I combined two of my favorite things ornaments and cake. Oh yeah and Christmas. I am really like a big kid for Christmas and I love everything about it. The ornament cake will definitely get you in the Christmas spirit.
Making this ornament cake is super easy. I know, I know I say that a lot. But, you can make this cake and decorate in just a few hours. Plus, the design possibilities are endless. When you are finished you are sure to impress everyone. Shhh… it is our little secret.
This page may contain affiliate links which mean that if you make a purchase from any links directed from this website I may earn a small commission. I only recommend things that I use and love and classes I have taken. Thank you very much for your ongoing support.
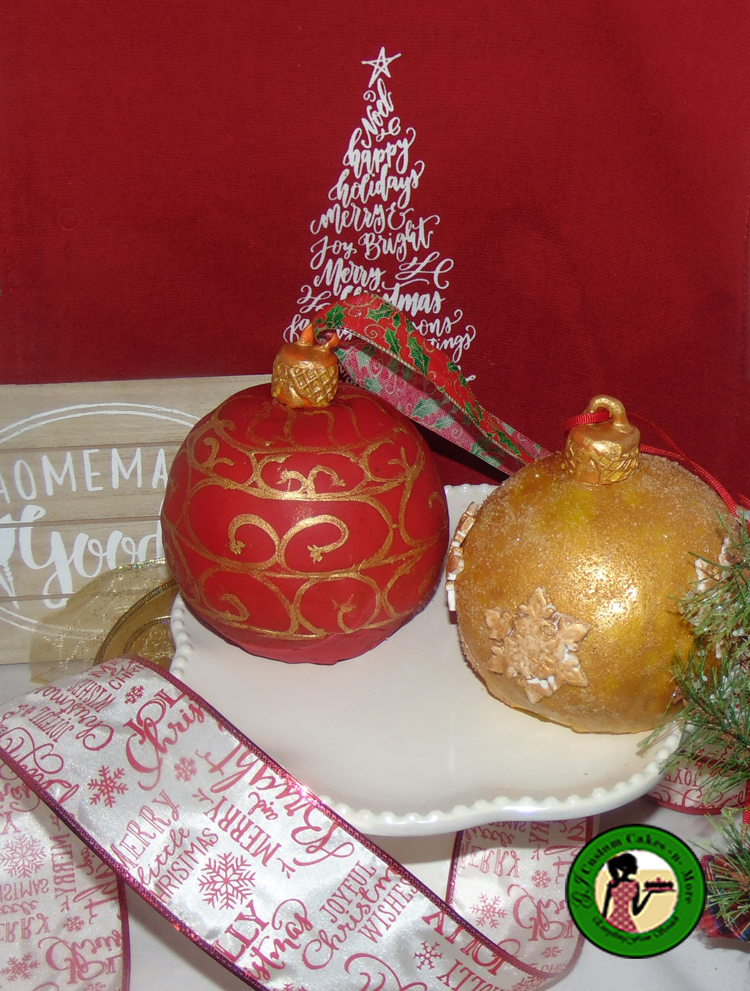
Items needed:
- One 8-inch cake recipe of your favorite cake
- Two 5-inch sphere ball pan
- Ganache or buttercream
- 4 oz of red fondant, 4 oz of yellow fondant (you can make your own using this easy recipe for Marshmallow fondant)
- 1 6-inch round cake circle
- Final cake board or cake stand
- Edible gold luster dust
- Edible gold sparkle dust or glitter (I used homemade edible glitter that I made from gelatin)
- Paintbrush small for fine detail and medium size to paint cake
- Small Spatula
Step 1: Bake the Cake
Bake the cake according to the instructions from your favorite recipe in the small sphere pan. If you don’t have a sphere pan you can use a small Pyrex dish or trim free hand. I used an 8-inch recipe and was able to get two balls and a small ball.
Step 2: Fill and frost the cake
Once the cakes are cool, trim the top and a small section for the bottom of the cake to stand on. Then fill and frost cake or fill, crumb coat and add final frosting. I used ganache for the filling and final frosting, but you can use buttercream.
Step 3: Cover the cake with fondant
When the ganache or buttercream is set it is time to add fondant. Roll out fondant to about a 1/8 inch thick. Then place on the ball. Because these cake balls are small, covering is easier. Color the first ornament cake with red fondant and the second with yellow fondant.

Once you get to the bottom of the cake, turn over and smooth the fondant then trim. Then flip over and smooth with a sugar smoother or a small piece of acetate. I am afraid a regular fondant smoother might not work. Smooth until you are happy with it. Then place in the refrigerator to firm up about 10-15 minutes.
Step 4: Time to decorate the cake to look like a Christmas ornament
Once the fondant is firm, mix some edible gold luster dust with lemon extract or ever-clear. For the first painted ornament cake, use a piece of string and indent slightly all around. I started with the red ornament. Indent from top to bottom and make sure the lines are even. Then using a fine brush begin painting the line with the gold paint.
Paint any design that you choose in between the two gold lines. I painted the design from an ornament from our Christmas tree. Just remember to have fun.
Using a larger brush begin painting the yellow ornament cake with the gold paint. Always paint in the same direction. The hardest part of this cake is to wait for the paint to dry to apply a second coat. Then add a second coat. When you are happy begin adding you edible glitter. This adds texture to the ornament.

Then using a small snowflake cutter, I cut out a few snowflakes to add to the ornament. I colored them lightly and placed on the cake.

Step 5: Making the top of the ornament cake
Make the tops of the ornament cake by taking a small piece of yellow or red fondant and roll into a ball. Then, roll four small strings and add to the ornament tops. Make sure the holes are large enough for a string or ribbon to go through.
Using a texture mat roll out a small piece of fondant and add to the side of the ornament top. Another option is to add texture to the side of the ornament tops using a Dresden tool or a paint brush.
Then paint the ornament tops gold. Once the paint is dry add to the cake using a toothpick. Then using a piece ribbon run through the hole that you created and you have a string to add your ornament cake to the tree.
That is it. You are done… Happy Caking. 
If you love this tutorial share with your friends and leave us a comment below.
