How to Make Simple but Beautiful Cake Pops
This post should have been before cake pops tricks and tips. However, better late than never. To say that cake pops are easy is an oxymoron because there is nothing easy about the process. Correction, they are easy to make but are a bit time-consuming. But, the end result is a delicious cake on a stick. Plus, they are a great addition to any party, no cutting or cleaning up necessary. I do believe it is a good solution for those who are health conscious as they would prefer a cake pop over a slice of cake. Who can resist cake covered in chocolate right?
I cannot remember how I started making cake pops and while I make them all the time they are not my favorite things to make. Why? Because I can decorate a few cakes much faster than it takes to make cake pops. However, they are just too cute and delicious to resist an opportunity to make them. My goal today is to convince you how easy it is to make cake pops *cough.*
This page may contain affiliate links which means that if you make a purchase from any links directed from this website I may earn a small commission. I only recommend things that I use and love and the classes I have taken. Thank you very much for your ongoing support.
What is a Cake Pop?
A cake pop is a small piece of cake on a lollipop stick. The cake is crumbled and mixed with frosting or ganache and made into a truffle. Then dipped in chocolate. Cake pops can be shaped into anything such as animals, cupcakes, etc. Once you get the hang of it the sky is the limit.
Schedule for Making Cake Pops
Making cake pops requires a bit of patience and time because there is no way around all the necessary steps required (rolling and dipping). Therefore, it is much better to make them over a few days so that you can enjoy the process a bit more. I suggest: baking the cake and crumbling on day 1, adding frosting to the cake crumbles and rolling into a ball on day 2 and dipping and decorating day 3.
This step-by-step tutorial will show you how to make cake pops that are simple and easy to decorate. There I go again with the word easy. Here you go let’s get popping.
Supplies you will need to make cake pops
- Box mix of your choice or a butter-based 8-inch scratch recipe. (Makes between 20-24 cake pops)
- Cold frosting/buttercream (I use Italian Meringue Buttercream). I cannot give any insight on canned frosting because I have only used homemade frosting.
- Cake pop sticks
- Styrofoam block
- Candy melts (whatever color or candy colors to make your own)
- Plastic containers to melt the candy
- EZ thins if using Wilton Candy melt.
- A tablespoon or cookie scoop
How to Make Cake Pops
Step 1: Bake the cake then destroy it I mean crush it into fine crumbs
Bake the cakes according to the instructions. There are some adjustments needed for the box mix, see it in last week’s post. Once the cake is cool, remove the crust from the side of the cake and break into pieces.

Then crush the cake into fine crumbs by using either a food processor, a hand mixer or your hands. There should be no lumps in the mix. Place in the refrigerator for about 30 minutes or so. If you are in a pinch add the frosting at this stage.
Step 2: Add cold frosting a little at a time
Remove the cake crumbs from the refrigerator and add frosting one tablespoon at a time. I suggest removing a cup of crumbs before adding the frosting. The cup of crumbs can be used later if you add too much frosting. Using a hand mixer or food processor mix the frosting into the batter. If you like to get your hands dirty you can use your hands. Mix until it comes together in a ball but does not crumble or crack.
Be careful not to add too much frosting or your cake pops will become too moist. If for any reason you used too much frosting, add the cake crumbs and mix again. This step is the most important because it determines how your cake pops will look. Also, if it is too moist it will fall off the stick. See 7 tips and tricks for additional help if your cake balls keep crumbling.
Step 3: Roll into a ball
It is so much easier to roll the cake balls when the cake is cold. Your hands will thank me. You will know when it is ready when your cake pops come together without cracking or crumbling. Then use a tablespoon and measure two tablespoons.  Squeeze the two together and begin rolling in the palm of your hands to form a ball. I usually place the cake pops back into the tablespoon to keep the roundness. Place the balls on a sheet pan lined with parchment paper covered with plastic wrap in the refrigerator for about 30 minutes to an hour or overnight.
Step 4: Add the sticks to cake pops
Melt the candy melts 3o seconds at a time at 50 percent power until it flows like lava. If the candy melt is too thick add EZ thins or shortening to get it to a good consistency.  Once the cake pops have been chilled, dip the cake pop stick into the candy melt and insert it into the cake pop.
  Then seal the stick in with the candy melt. Now is the time to cover any cracks with candy melts before dipping. If you want to be super careful you may put them back into the refrigerator. I tend to skip this step because I am usually pressed for time. Once the sticks are sealed it is time to dip the cake pops.
Step 5: Dip cake pops
Dipping the cake pops is very simple but this is where you will start seeing the most problems.  Once the candy melts and the cake pops are at around the same temperature, dip the cake pops one at a time.
  Make sure the bowl is deep enough to cover the cake pops. This will make sure you only make one dip. Do not swirl when you dip. Use a spoon to add additional candy melts. Shake off the excess by slight tapping your wrist. Don’t forget to pop all the bubbles.

Place the cake pops into a premarked hole on the styrofoam block. If you are going to add sprinkles, don’t wait too long because the candy melts dry quickly.
Step 6: Decorate cake pops
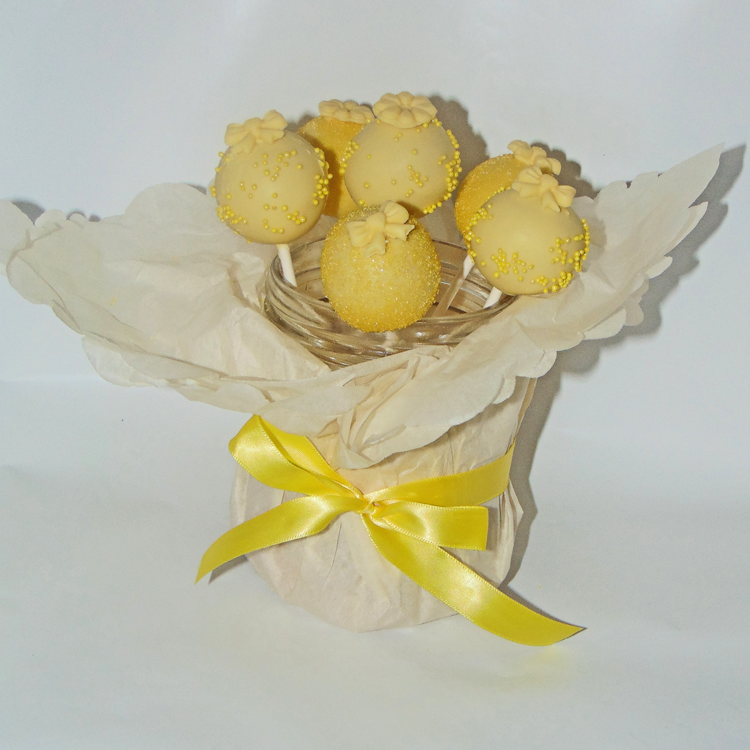
This is the most fun of all the steps because the possibilities are endless. You can use sprinkles, sanding sugar (my favorite), small candy pearls or leave it plain then add other candy decorations. Here, I added some sanding sugar. Another simple way to make decorations is to add some candy melt to any mold then place it in the refrigerator for a few minutes. Here I used my bow mold. I also used a flower mold sorry I didn’t take a picture.
  Here is the final result.
Simple but beautiful. The view from the top. That was easy right… As always don’t forget to pin for later and share it with your friends.
Do you love or have any questions about making cake pops? Let us know… Comment below.

Related Posts
How to Thin Candy Melts Three Ways for Dipping Cake Pops
Have you ever melted candy melts and it became a goopy mess? Totally undippable chocolate.
January 6, 2021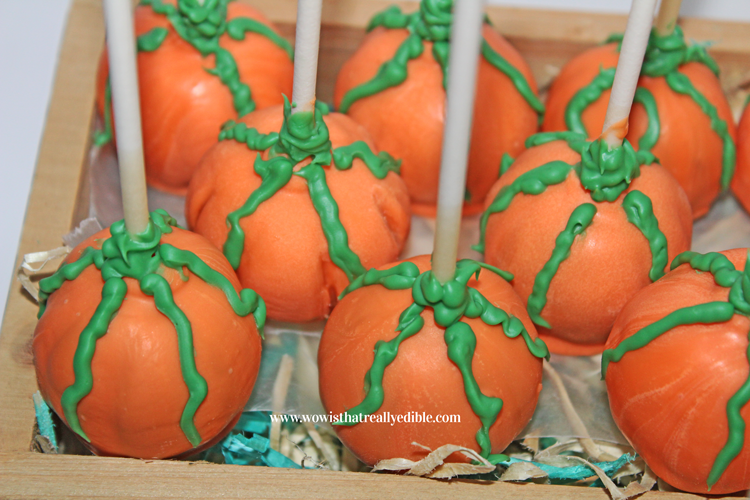
How to make Pumpkin Cake Pops
It’s been a while since I did a post on the blog about cake pops.
October 19, 2018
How to Make Geode Cake Pops: Free Tutorial - Wow! Is that really edible? Custom Cakes+ Cake Decorating Tutorials | 18th May 18
[…] order to make this geode cake pops you need to know the basics of making cake pops. You also need to know how to fix the cake pops if it develops a crack or won’t come […]