How to make Pumpkin Cake Pops
It’s been a while since I did a post on the blog about cake pops. Nevertheless, I couldn’t resist posting about these pumpkin cake pops. If you have been following my blog you know that I have a love-hate relationship with cake pops. I love making them, however, they sometimes don’t love me. These pumpkin cake pops are super cute and easy to make. Why pumpkin cake pops? Because I love everything pumpkin and I wanted to join the October pumpkin craze. And why not, even breakfast cereal is pumpkin flavored.
Although there is a huge learning curve when making cake pops. To make cake pop easier I have created 7 tips and tricks to make perfect cake pops and the basics in how to make beautiful but simple cake pops. These two posts are filled with everything you need to know about making cake pops to get you going. If you need more Craftsy has a course Party cake pops that has many tips and tricks for beginners as well as advanced.

This page may contain affiliate links which mean that if you make a purchase from any links directed from this website I may earn a small commission. I only recommend things that I use and love and the classes I have taken. Thank you very much for your ongoing support.
How to make pumpkin cake pops
To make pumpkin cake pops, I started off with a basic round ball and shaped it from there. Plus I measure everyone to have a uniform look and I know they won’t fall off the stick. The best thing about this no equipment needed. I used the lollipop stick
Materials:
- Orange candy melt or white candy melt with orange candy color
- Green candy melt
- Wilton Ez-Thin
- 1 batch of butter based vanilla cake/chocolate (1 box mix)
- 1-2 tbsp buttercream or ganache
- lollipop sticks
- Cup/bowl
Steps for making pumpkin cake pops
Remove the crust from the cake and crumble until it is a fine crumb. Then add buttercream or ganache. Add a little at a time until it comes together. I prefer to use cold cake with cold buttercream, it comes together so much faster.
Roll into a ball and place in the refrigerator for 30 minutes (to get more information on how I get perfect size cake balls to see how to make simple but beautiful cake pops). 
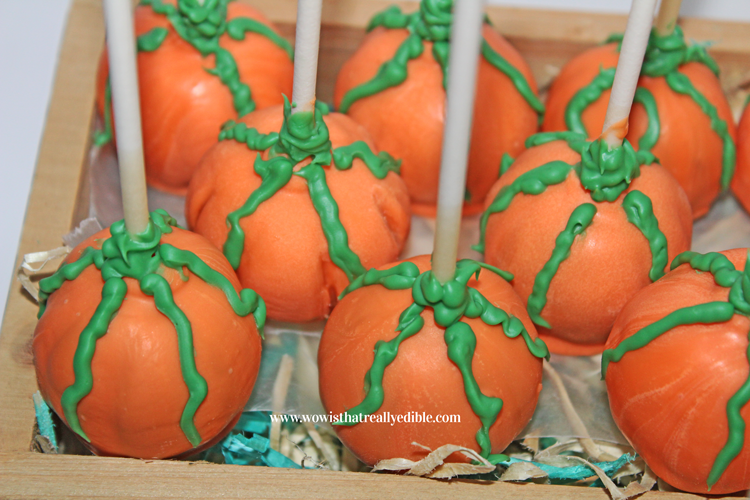
To make the shape like a real pumpkin, use your thumb to flatten the top of the cake ball, then use a cake pop stick and indent the cake pop all around. Add as many indents as you like.
Melt the candy and dip cake pops
Melt candy melts according to the instructions. If you are using Wilton candy melt, it will be too thick. Add Wilton E-Z thin to thin out the candy melt to a dipping consistency. Dip the cake pop stick into the candy melt and insert the stick into the cake ball. Do not remove the excess candy melt here (since the cake pop is not upside down), it becomes the vine.
Follow the same step with the other cake balls.
Then dip the cake balls into the candy melt. Make sure the candy melt is not too hot and the cake ball is not too cold. You will get some cracking.
Shake off excess and place on a tray. I used a baking sheet with wax paper on top.
Melt some green candy melt and place in a piping bag or ziplock bag. Cut a small hole at the bottom and pipe some “tendrils.” Shake your hand as you pipe to make it look like twists. I added four, but you can add as many as you like.

Continue adding to all the cake pops. Clean off any extra candy melt that appears on the stick.
Look how great they look. I added them to this cute box I bought at JoAnn.
How about you, do you like making cake pops? If you do make them let me know how it turned out. Don’t forget to share. Until next time.
Related Posts
How to Thin Candy Melts Three Ways for Dipping Cake Pops
Have you ever melted candy melts and it became a goopy mess? Totally undippable chocolate.
January 6, 2021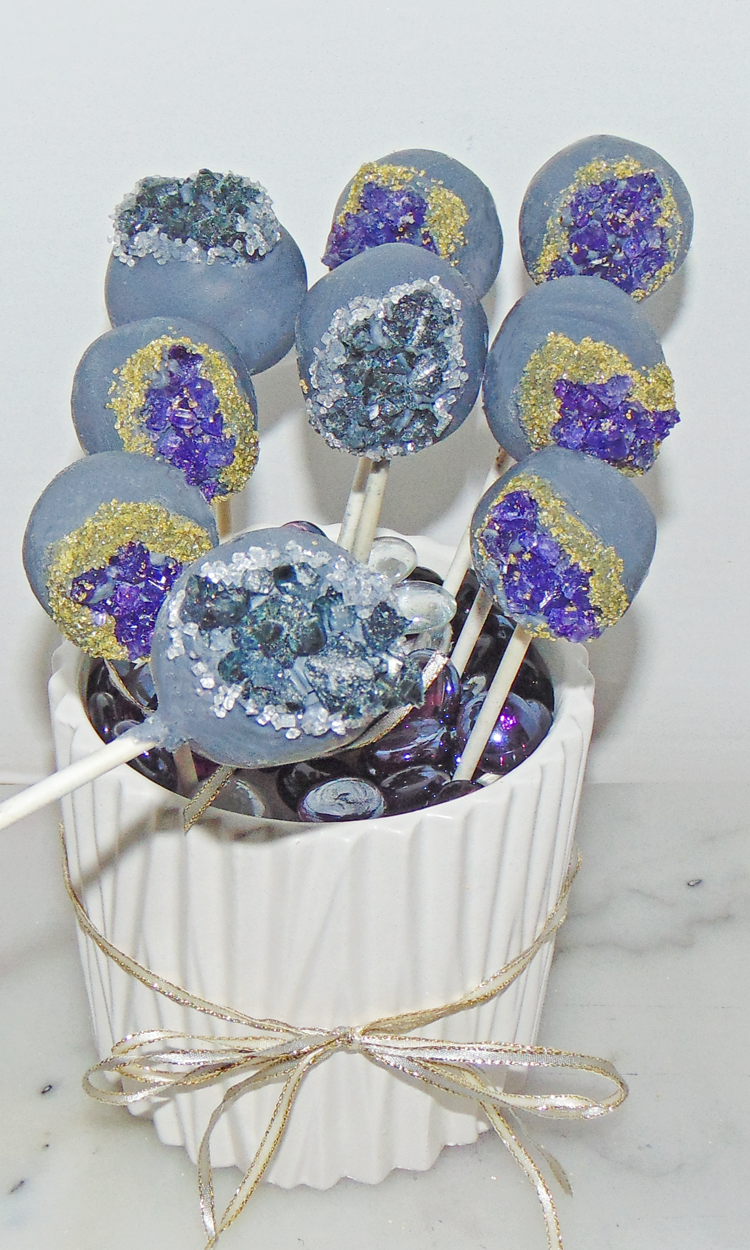
How to Make Geode Cake Pops: Free Tutorial
I am a little late to the party with the geode cake trend. This week
May 18, 2018