How to make Cakesicles
Are you looking for a cute and easy dessert idea for the 4th of July? How about cakesicles (cake-sicles)?. Today I’m going to show you how to make these lovely yummy cake on a stick with a simple red, blue and white decoration. But, you can decorate them to match any theme or characters. They are super cute and are a great alternative to cake pops. Just more cake. Who doesn’t like more cake?
I don’t know where I have been, but apparently, these things have been around for a while. Recently I saw a bunch of these on Instagram and couldn’t resist the urge to make them. They were so easy to make. I love these things, I promise you will love them too.

What are Cakesicles?
Cakesicles are small pieces of cake that are shaped like popsicles. They do have cakesicle molds online to make them but, you can mold them by hand as I did. Plus, I didn’t want to buy another mold. However, as a test, I made a cakesicle using a regular popsicle mold and it worked out very well. Even though I had a hard time unmolding it, it came out great.
This page may contain affiliate links which means that if you make a purchase from any links directed from this website I may earn a small commission. I only recommend things that I use and love and the classes I have taken. Thank you very much for your ongoing support.
So how do we make Cakesicles?
Making the cakesicle is similar to making cake pops. They are made from crumbling cake adding chocolate or buttercream, then dipping in candy melts. The only difference is they are much bigger. For this batch of cakesicles, I did not have any problems with cracking however, only time will tell.
Materials Needed:
- Cake crumble of your favorite cake
- Candy melts (red, white and blue)
- Ez-thin
- Popsicle sticks
- Deep bowl
- Edible glitter gold stars
- Melted Chocolate (I used Trader Joe’s 72% dark chocolate)
- Wax paper
Things to consider:
- While a moist oil-based cake can work it is better to use a butter-based cake.
- If you are not a fan of chocolate you can use buttercream instead. The chocolate firms up much better in the refrigerator.
- You are going to need a lot of candy melts and a tall container.
Now that we have that out of the way. Let’s go.
Shaping the Cakesicle
Crumble the cake using your hands or a mixer. A cold cake works best.

Then mix the crumbled cake with melted chocolate. Add a little at a time.

Combine until the final mixture is the consistency of cookie dough.

Shaping the cakesicle by hand is super easy. Measure about 4 tablespoons of the cake dough then roll it into a ball and flatten. If you are using a mold you can skip this step.

I used my gum paste flower drying rack to get the shape that I wanted but you can use your hands.

Add the popsicle stick with some melted chocolate to secure the stick.

Place the cakesicles in the refrigerator for about 30 minutes. I lost one before it made its way to the refrigerator.

Dipping and decorating the Cakesicle
Melt the chocolate by following the instructions on the container. This is important, make sure there is enough candy melt to cover the top of the cakesicle. Add Ez-thin as needed to thin out the candy melts.
Remove the cakesicles from the refrigerator and let it sit for a few minutes.

Then fully immerse into the candy melt. This is the first coating.

Add them to a piece of wax paper to dry. If you are making a mix of colors melt them and add them a little bit of each color. If not re-dip into the same color.

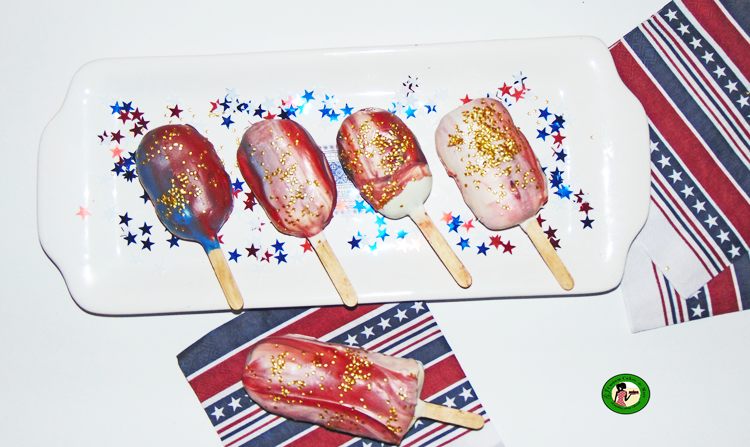
Dip the cakesicle again in this new mixture of candy melts. Add decorations right away. I added edible glitter gold stars.

Let them sit on the wax paper to dry. Then place on a serving plate or in individual bags.

There you have it. Super easy and cute.

Possibilities are endless.

Now it’s time to take a bite.

Do you make cakesicles? What are your thoughts on making them? Let me know with a comment below.
Posts that are super useful: