Heart Candy Box Cake Perfect for Valentines Day
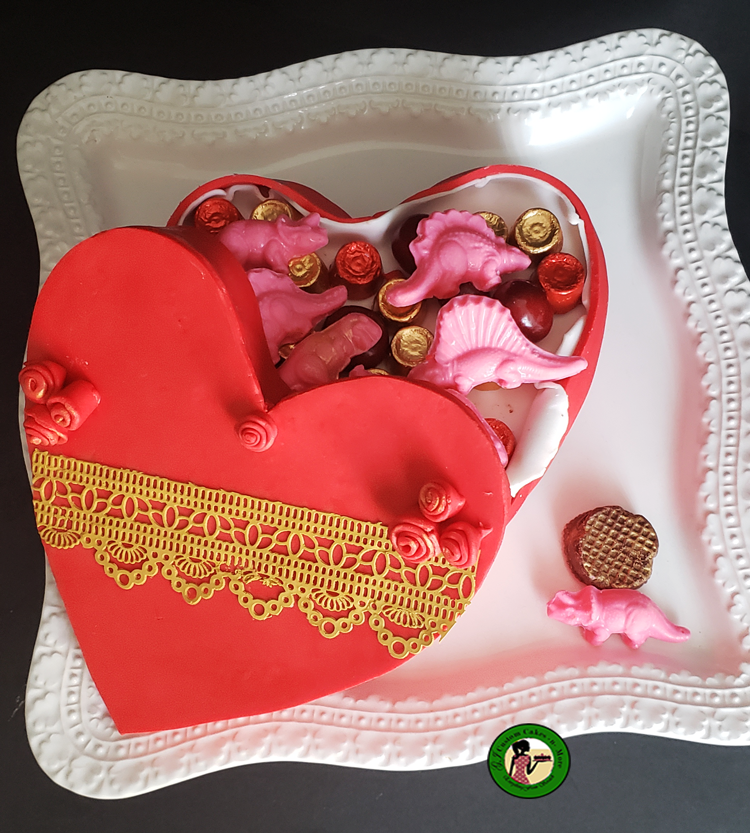
Valentines Day is only a few days away. So I made this Heart Candy Box Cake with chocolate dinosaurs for my young Paleontologist. Yes, I said chocolate dinosaurs. My little man was missing our old apartment and I wanted to show him just how much mommy loves him. Plus, the new house is way better than the apartment. Now, I know it is not traditional to add pink chocolate dinosaurs, but that’s his love language. He loves everything dinosaur.
Ever since we moved into the new house it has been nonstop unpacking and organizing for me. Every second I get I’m thinking of creative ways to organize or store things. This heart candy box cake was a great way to relax and get back into the groove of cake decorating. The cake itself is super easy to make and will definitely fool your guest or love (minus the dinosaurs of course) into thinking it is a real box of chocolate. In this tutorial, I will show you how I made this heart candy box cake step by step including the dinosaurs. However, you can use a regular chocolate mold.
This page may contain affiliate links which means that if you make a purchase from any links directed from this website I may earn a small commission. I only recommend things that I use and love and the classes I have taken. Thank you very much for your ongoing support.
How to Make Heart Candy Box Cake
To make the candy box cake you are going to need a few items. Make the candy in advance. Because the cover needs some time to dry, make the cake in advance to get the proper size for the cover.
Materials:
- 1 or 2 8-inch square cake
- buttercream (I used Lauren’s Kitchen buttercream)
- Red fondant
- White fondant (You can find the recipe for Marshmallow fondant here)
- Dinosaur chocolate mold
- Candy chocolate mold
- Candy Melt
- Heart template (Download your free copy here)
- Heart cake board (cut out from foam core board)
- Paring knife
- Serrated knife
Steps for Decorating the Cake
- Melt some candy melt and pour into the dinosaur chocolate mold.

- Use the heart template to cut out a cake board either from foam core board or a regular cake board
- Print the heart template and cut out the heart shape.
- Once the cake is baked and cooled use a small paring knife to cut out the cake. Then split the cake in two using a serrated knife.
- Place the cake on the cake board and cut a little bit from all around the cake to make space for buttercream. You want the cake and the board to be one piece.
- Remove cakes and add a small amount of buttercream to the cake board.
- Add your first layer and center it.
- Then smooth out the buttercream
- Add the next layer, then make sure both cakes line up with each other.
- Add frosting to the top of the cake and smooth out with a spatula. Carefully add the frosting to the side. I created a second cake board and used that to even out the frosting all around using this method found here.
- Use a spatula and or bench scraper remove the excess buttercream. Place in the refrigerator for about 30 minutes or until the frosting is set and your finger does not leave a mark in the buttercream.


Covering in Fondant
- Roll out a piece of fondant and cut out a bit higher than your cake. I used a quilter’s ruler to cut out the height. Mine has been used so much it is missing the measurements. I also had to use two pieces of fondant because my mat was not long enough for a full strip. To get a long strip of fondant, measure around the cake with a tape measure and cut the fondant with about an inch over then add to the cake.
- Add the fondant to the cake and using a fondant smoother, smooth out the sides.
- Place the second piece on the cake and smooth again. Cut the areas that overlap using a Xacto knife.
- Smooth out the seams with a fondant smoother.
- Roll out a piece of white fondant and add to the top of the box. Let it overlap a bit over the top of the cake.
- Then add the chocolate dinosaurs. I had some Rolos and cherry covered chocolate so I used them to give the dinosaur some height. Of course, you can use any chocolate you want.


Making the lid
- Add some tylose some red fondant and it sits for a few minutes to get a little stiff. Then using the template cut out the lid, leaving about two inches. The best way to check is it lay the fondant on top of the cake.
- To make the side of the top use a ruler and cut a long strip. Turn the lid upside down and glue the other part of the lid. Place something inside so that it keeps its shape. I used the extra cake board was unsuccessful with the paper towel.
- Once the lid is dried then its time to add the decorations.


- I decorated my box with some edible lace I had left over from another project.

- Then I added tiny ribbon roses.
How To make a ribbon rose
- Roll out a piece of red fondant and cut small strips. Then begin rolling the fondant.

- Make a small center and keep rolling, frill the edges a bit.

- Roll until you get the size you need. Trim down the rose. Then add the rose to the cover. I made 6 roses for this project.

- Use some water or shortening and attach to the top. I was going to add some gold touches but decided it was perfect the way it was.

That’s it, easy peasy right? Now you can go and wow your guest. If you love this tutorial, don’t forget to share the love. Also if you tried it comment below.
